Showing posts with label Windows 10. Show all posts

Thursday, February 8, 2018

How to fix Corrupted Recycle Bin in Windows 10

As we generally believe windows 10 is the latest windows Developed by Microsoft corporation, it has many features that are some times seems to be complex to handle and to configure.
Notwithstanding, today i will like to look at one issue that i observed which i think is important to share with you guys which is How to fix corrupted Recycle Bin in Windows 10

the trash (also known as the recycle bin in Windows and by other names in other operating systems ) is temporary storage for files that have been deleted in a file manager by the user, but not yet permanently erased from the file system. Typically, a recycle bin is presented as a special file directory to the user (whether or not it is actually a single directory depends on the implementation), allowing the user to browse deleted files, delete those that were deleted by mistake, or delete them permanently (either one by one, or by the "Empty Trash" function).

If you are unable to empty the Recycle Bin or restore or delete a file or a folder from the Recycle Bin, this may indicate that your Recycle Bin is corrupted.


How to fix corrupted Recycle Bin in Windows 10 without reinstalling new windows

READ ALSO:
How To free Up Space on Your Hard-Disk after Installing/upgrading windows on your PC
How to Enable or Disable Cortana on your Lock Screen in Windows 10

The Recycle Bin feature operates as For each drive letter, that is for drives and their partitions available on your device, Windows creates a hidden Recycle.Bin folder. That folder contains sub folders which are named after the user's SID. In that sub folder, the operating system stores file deleted by the appropriate user. External hard drives connected to your computer will also have the Recycle.Bin folder. However, USB flash drives and memory cards (SD/MMC) will not have a Recycle Bin. Files deleted from removable drives will be permanently deleted.

To fix a corrupted Recycle Bin in Windows 10, do the following.
  1. Open the This PC folder in File Explorer.
  2. Note each letter you have assigned for your hard drives. For example, C:, D:, E:, and so on.
  3. Now, open an elevated command prompt.
  4. Type the following command: rd /s /q C:\$Recycle.bin. This will remove the Recycle Bin folder and its settings from your C: drive.
  5. Repeat the command for all the drive letters.
You are done. The Recycle Bin now appears empty.
Read More »

Monday, October 23, 2017

How To free Up Space on Your Hard-Disk after Installing/upgrading windows on your PC

Computer usually uses memory which is normally called hard drive or hard disk which enables the computer to save musics, videos, pictures, software and lots more, so this implies that a computer cannot save large amount of data as long as it does not have the require space to do so.
usually after windows installation/upgrade on a computer you will notice that some space are consumed by the previous windows file and its data or after upgrading windows especially windows10
How To free Up Space on Your Hard-Disk after Installing/upgrading windows on your PC


However, if your windows installation or the upgrade was successful and you've got everything working perfectly, then there's no need to keep these files there is need to clean the space and this can be done using Disk-clean-up-Manager

Disk Cleanup (cleanmgr.exe) is a computer maintenance utility included in Microsoft Windows designed to free up disk space on a computer's hard drive. The utility first searches and analyzes the hard drive for files that are no longer of any use, and then removes the unnecessary files. There are a number of different file categories that Disk Cleanup targets when performing the initial disk analysis:

    Compression of old files
    Temporary Internet files
    Temporary Windows files
    Downloaded program files
    Recycle Bin
    Removal of unused applications or optional Windows components
    Setup log files
    Offline web pages (cached)
    WinSxS (Windows component store)


How to free Up space on your Disk after installing windows be it windows7, windows8, windows8.1 or windows10, on your PC

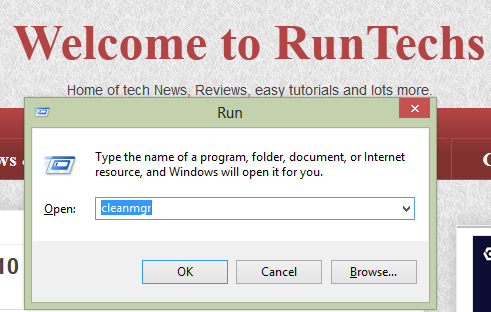
  • Press Win + R shortcut keys together on the keyboard to open the Run dialog.
  • Type the following in the Run box "cleanmgr"
How To free Up Space on Your Hard-Disk after Installing/upgrading windows on your PC

  •  Click the Clean up system files button to switch the Disk Cleanup tool to extended mode

How To free Up Space on Your Hard-Disk after Installing/upgrading windows on your PCg
  •  Find and check the Previous Windows installation(s) item.

How To free Up Space on Your Hard-Disk after Installing/upgrading windows on your PC
  •  Click OK and Then you are good to go.
Dont forget to share.
Read More »

Wednesday, October 11, 2017

Microsoft Windows 10 Build 10240.17643 is Finally out with KB4042895

You know we are in the world of technology and development as well as improvement,  Microsoft is doing their best to be the best in the world in times of their kind if you can remember they have introduced many types of OS such as windows7 windows8, windows8.1 and now Windows10.

Windows 10 is a service, which means it gets better through periodic software updates.
The great news is you usually don’t have to do anything–updates automatically download and install on your computer be it desktop or laptop whenever they’re available and when you are connected to the internet.  So the great news is that  they finally released Windows 10 Build 10240.17643 with KB4042895.


Microsoft Windows 10 Build 10240.17643 is Finally out with KB4042895


Microsoft finally released Windows 10 Build 10240.17643. The package KB4042895 is now available for everyone. This cumulate update is applicable to the initial version of Windows 10 released in July 2015.

RECOMMENDATIONS FOR YOU:
  1. Announcing Windows 10 Insider Preview Build 16251 PC + 15235 Mobile
  2. How to Enable or Disable Cortana on your Lock Screen in Windows 10 

The change log comes with the following highlights.

  •  Addressed issue where the Universal CRT _splitpath was not handling multibyte strings correctly, which caused apps to fail when accessing multibyte filenames.
  • Addressed issue where the Universal CRT caused the linker (link.exe) to stop working for large projects.
  • Addressed issue where the MSMQ performance counter (MSMQ Queue) may not populate queue instances when the server hosts a clustered MSMQ role
  • Addressed issue with the Lock Workstation policy for smart cards where, in some cases, the system doesn’t lock when you remove the smart card.
  • Addressed issue with form submissions in Internet Explorer
  • Addressed issue with URL encoding in Internet Explorer.
  • Addressed issue that prevents an element from receiving focus in Internet Explorer.
  • Addressed issue with the docking and undocking of Internet Explorer windows.
  • Addressed issue with the rendering of a graphics element in Internet Explorer.
  • Addressed issue caused by a pop-up window in Internet Explorer.
  • Addressed issue where USBHUB.SYS randomly causes memory corruption that results in random system crashes that are extremely difficult to diagnose. 
  • Security updates to Microsoft Windows Search Component, Windows kernel-mode drivers, Microsoft Graphics Component, Internet Explorer, Windows kernel, Microsoft Edge, Windows Authentication, Windows TPM, Device Guard, Windows Wireless Networking, Windows Storage and Filesystems, Microsoft Windows DNS, Microsoft Scripting Engine, Windows Server, Microsoft JET Database Engine, and the Windows SMB Server.
 windows10 will be now very interesting far better than before with to introduction of Windows 10 Build 10240.17643 is out with KB4042895

SOURCE: Microsoft
Dont forget to share!
Read More »

Saturday, September 16, 2017

How To change the audio channel for Narrator in Windows 10

In our aim of bringing you the latest updates about techs news and how to's today let take a look on how to To change the audio channel  for Narrator in Windows 10, 
Narrator is a screen-reading app built into Windows 10. Narrator lets users with vision issues to use PC and complete common tasks. In recent Windows 10 builds you can change the audio channel for Narrator
simple steps on How To change the audio channel  for Narrator in Windows 10

 Narrator lets you use your PC without a display or mouse to complete common tasks if you’re blind or have low vision. It reads and interacts with things on the screen, like text and buttons. Use Narrator to read and write email, browse the Internet, and work with documents.
 

Specific commands let you navigate Windows, the web, and apps, as well as get info about the area of the PC you're in. Navigation is available using headings, links, landmarks, and more. You can read text (including punctuation) by page, paragraph, line, word, and character as well as determine characteristics like font and text color. Efficiently review tables with row and column navigation.
 

Narrator also has a navigation and reading mode called Scan Mode. Use it to get around Windows 10 using just the up and down arrows on your keyboard. You can also use a braille display to navigate your PC and read text.

Steps To change the audio channel  for Narrator in Windows 10 

1. Open the Settings app. 
simple steps on How To change the audio channel  for Narrator in Windows 10

2. Go to Ease of Access -> Narrator. 
simple steps on How To change the audio channel  for Narrator in Windows 10

3. On the right, enable Narrator if required as shown above.
simple steps on How To change the audio channel  for Narrator in Windows 10

4. Scroll down to the Sounds you hear section.
5. In the Select audio channel for Narrator speech output drop down list, select the desired device,


The ability to change the audio channel for Narrator speech output is new to Windows 10 build 16362. It is not available in previous builds. Windows 10 build 16362 represents the upcoming feature update of Windows 10, currently known as "Redstone 4", so the updated Narrator feature is expected to be the part of this feature update.

Dont forget to share.
Read More »

Saturday, August 12, 2017

Microsoft announces Windows 10 Pro for Workstations

Microsoft officially announced a new high-end edition of Windows 10. It is Windows 10 Pro for Workstations, formerly known as Windows 10 for Advanced PCs. Let's see which features it includes.
The new edition of the OS targets mostly power users. It comes with support for server grade PC hardware and aims to increase the performance and reliability of high-end PCs.


Microsoft announces Windows 10 Pro for Workstations  

Read also:

 How to Enable or Disable Cortana on your Lock Screen in Windows 10 

Windows 10 Game Mode is Getting Nice Improvements

Microsoft mentioned the following highlights.


  • ReFS (Resilient file system): ReFS provides cloud-grade resiliency for data on fault-tolerant storage spaces and manages very large volumes with ease. ReFS is designed to be resilient to data corruption, optimized for handling large data volumes, auto-correcting and more. It protects your data with integrity streams on your mirrored storage spaces. Using its integrity streams, ReFS detects when data becomes corrupt on one of the mirrored drives and uses a healthy copy of your data on the other drive to correct and protect your precious data.
  • Persistent memory: Windows 10 Pro for Workstations provides the most demanding apps and data with the performance they require with non-volatile memory modules (NVDIMM-N) hardware. NVDIMM-N enables you to read and write your files with the fastest speed possible, the speed of the computer’s main memory. Because NVDIMM-N is non-volatile memory, your files will still be there, even when you switch your workstation off.
  • Faster file sharing: Windows 10 Pro for Workstations includes a feature called SMB Direct, which supports the use of network adapters that have Remote Direct Memory Access (RDMA) capability. Network adapters that have RDMA can function at full speed with very low latency, while using very little CPU. For applications that access large datasets on remote SMB file shares, this feature enables:
    • Increased throughput: Leverages the full throughput of high speed networks where the network adapters coordinate the transfer of large amounts of data at line speed.
    • Low latency: Provides extremely fast responses to network requests, and, as a result, makes remote file storage feel as if it is directly attached storage.
    • Low CPU utilization: Uses fewer CPU cycles when transferring data over the network, which leaves more power available to other applications running on the system. 
  • Expanded hardware support: One of the top pain points expressed by our Windows Insiders was the limits on taking advantage of the raw power of their machine. Hence, we are expanding hardware support in Windows 10 Pro for Workstations. Users will now be able to run Windows 10 Pro for Workstations on devices with high performance configurations including server grade Intel Xeon or AMD Opteron processors, with up to 4 CPUs (today limited to 2 CPUs) and add massive memory up to 6TB (today limited to 2TB).
Windows 10 Pro for Workstations is expected to be a part of Windows 10 Fall Creators Update, which will become available this fall.

Source: Microsoft.


Read More »

Thursday, August 10, 2017

Windows 10 Game Mode is Getting Nice Improvements

As you may already know, Windows 10 Creators Update includes a special Game Mode feature, which boosts game performance for some games under certain circumstances. There are some nifty improvements coming to this feature in the near future.

Game Mode is a new feature of Windows 10 made especially for gamers. When enabled, it boosts the performance and priority of games. The new mode prioritizes CPU and graphics (GPU) resources to make the game run faster and smoother.
Read also:Announcing Windows 10 Insider Preview Build 16251 PC + 15235 Mobile 

To enable the Game mode, you need to change some options in the Settings app. However, opening the Settings app every time to toggle this is not practical or fast.

To resolve this issue, Microsoft is adding a special option to quickly enable the Game mode right from the Game bar. See the following screenshot:RS3 Game Bar Revised.
 Windows 10 Game Mode is Getting Nice Improvements

Game Bar Gets Even Better: On Windows 10, we’re making it easier than ever to enable or disable Game Mode on a per-game basis by putting a switch directly in the Game bar. Mixer broadcasting with the Game bar will now give you more choices on the audio you broadcast; a new settings option will let you choose to broadcast game-only audio, or system-wide audio. We’ve also added a new Xbox Live Network Troubleshooting option to the Settings menu in Windows 10, which will help you track down connectivity issues and optimize your online multiplayer experience.
Read also:How to Enable or Disable Cortana on your Lock Screen in Windows 10

As you can see, the Game bar is also getting a refined user interface, including a number of new options for broadcasting with the Microsoft Mixer service. The user can now stream the game audio only or stream sounds from all apps running in the OS.

These features will reach the production ring very soon.

Source: Microsoft.

Read More »

Friday, July 28, 2017

How to Enable or Disable Cortana on your Lock Screen in Windows 10

Cortana is your cloud-based personal assistant that works across your devices and other Microsoft services. Depending on the capabilities of your device and the version of Cortana you’re using, Cortana can provide a range of features, some of which are personalized. Cortana on Windows is available in certain regions and languages. If Cortana isn’t available for your Windows device, you can still search for files on your device in the search box on the taskbar. Cortana is also available on other platforms, such as Android and iOS, in select markets.

Cortana works best when you sign in and let her use data from your device, other Microsoft services, and third-party services you choose to connect. To provide you with personalized experiences, Cortana learns from certain data about you, such as your searches, calendar, contacts, and location. You’re in control of how much data you share. If you choose not to sign into Cortana on Windows, you can still chat with Cortana and use her to help you search the web, documents stored in Microsoft services like OneDrive, and your Windows device. See the section about Windows Search in the Privacy Statement for more information. If you don’t sign in, or you choose to sign out, your experiences will be more limited and they won’t be personalized with your Cortana data. On iOS and Android devices, Cortana only works when you sign in.

Starting with Windows 10 Insider Preview Build 14328, you can now have Cortana on your (Win+L) lock screen where you can ask her questions like “Remind me to take out the trash when I get home” or “When is the next Mariners game?” and get an immersive Cortana experience without having to unlock your device. You can also try asking Cortana “How is the traffic on my way home?” or “What is my schedule for tomorrow like?” For sensitive tasks or those that launch applications, Cortana will prompt you to unlock your device.

This tutorial will show you how to enable or disable Cortana on the (Win+L) lock screen for your account in Windows 10.

To Enable Hey Cortana on your Lock Screen
A) Click/tap on the Cortana icon or search box on your taskbar, click/tap on Settings, and turn on Use Cortana even when my device is locked under Lock screen. (see screenshot below)

B) Check or uncheck Let Cortana access my calendar, email, messages, and Power Bi data when my device is locked.


To Disable Hey Cortana on your Lock Screen
NOTE: This is the default setting.

A) Click/tap on the Cortana icon or search box on your taskbar, click/tap on Settings, and turn off Use Cortana even when my device is locked under Lock screen.
Read More »

Announcing Windows 10 Insider Preview Build 16251 PC + 15235 Mobile

Today we are excited to release Windows 10 Insider Preview Build 16251 for PC to Windows Insiders in the Fast ring! The same build will be available for Insiders who opted in to Skip Ahead. We are also releasing Windows 10 Mobile Insider Preview Build 15235 to Insiders in the Fast ring. We won’t have a new Windows Server Insider Preview build for Windows Insiders this week.

What’s New in Build 16251 For PC
Windows lets you link your phone and PC
You may remember at Build we talked about PCs and phones working better together. With Build 16251, we are introducing the first set of features that enable “linking” your phone to your PC. This build’s scenario is focused on cross-device web-browsing. Today, we’re asking for you Windows Insiders to help us test this experience out using your Android phones. Support for iPhone is coming very soon, stay tuned.

To get started, after installing today’s new build on your PC, go to Settings > Phone and link your phone. Having you link your phone ensures that your sessions from your phone are continued only on to the PC that you’ve chosen. After adding your phone to be linked, you will receive an SMS from us directing you to install a test application called “Microsoft Apps” for Android that completes the link between your phone and PC and enables one of our first cross device browsing scenarios.


After you’ve linked your phone, just go to your phone and start browsing the web. When you are at a website you want to view on your PC, simply invoke the native share experience on your phone and share the website to the “Continue on PC” option. You might need to click the “…” or more to add this test app to your share menu. Once invoked, it will first ask you to sign in with your Microsoft Account. It is important you use the same account you are using on your PC. Next it will ask you if you want to “Continue now” or “Continue later”. If you choose “Continue now”, the website will magically open on the linked PC. If you choose to “Continue later”, the website will show up under Action Center for you to get to later when you’re ready. Try it out and let us to know of any issues you run into!

Get web search results in Cortana without opening your browser

Now you can view the results that Cortana has for you without launching the web browser. For some questions, the Cortana pane will expand automatically, quickly showing you exactly what you need to know. It works with movies, celebrities, stock prices, weather, flight status – you name it! If Cortana doesn’t have a quick answer for your query, the pane won’t automatically expand. No worries! Just click the arrow next to the relevant web suggestion (or press the right arrow key) to see what the web has for you. We look forward to hearing your feedback, which you can file using the in-Cortana feedback button. 
 Read also:Microsoft Released Windows 10 Redstone 2 Build 14905 for Fast Ring Insiders

Use Cortana voice commands to lock, sign-out, shutdown, or turn off your PC

We have now enabled the ability for you to use Cortana to turn off, restart, lock, or sign-out of Windows. While previously announced, we haven’t fully enabled it via the cloud until now. So, in case your hands are busy at the moment, you don’t have to stop what you’re doing to turn off or lock your PC. Instead, you can say “Hey Cortana, turn off my PC” and Cortana will take care of it. In a similar fashion, you can use Cortana to restart your computer, sign-out, or lock your PC. Just use your voice and try out the following commands:


For some of these voice commands, such as the one for turning off your PC, Cortana may ask you for a verbal confirmation. You’ll have to respond to Cortana with a “Yes” for Cortana to complete the voice command.
In addition, you can also ask Cortana to execute the commands above on the Lock screen, but first you should enable Cortana on the Lock screen if you have not done so already.

Dont forget to share.
 
Read More »

Saturday, July 22, 2017

Microsoft confirms it’s cutting Windows 10 updates for Atom PCs

Microsoft has been preventing PCs with Intel Atom Clover Trail processors from obtaining the latest Windows 10 Creators Update. While many devices with Intel’s Atom Clover Trail chips were released in the Windows 8 era, Microsoft offered a free Windows 10 update to keep the tablet / laptop hybrids up-to-date. ZDNet revealed earlier this week that compatible drivers are preventing owners from updating to the Windows 10 Creators Update, and Microsoft has now confirmed to The Verge that it no longer supports Intel Atom Clover Trail processors for its latest Windows 10 updates.

Microsoft confirms it’s cutting Windows 10 updates for Atom PCs
“They require additional hardware support to provide the best possible experience when updating to the latest Windows 10 feature update, the Windows 10 Creators Update,” explains a Microsoft spokesperson. “However, these systems are no longer supported by Intel (End of Interactive Support), and without the necessary driver support, they may be incapable of moving to the Windows 10 Creators Update without a potential performance impact.”
Read Also:
  1. Apple reportedly prepping a mirror-like finish for the iPhone 8
  2. Samsung’s Unpacked event happens August 23, likely bringing the Galaxy Note 8 with it 

"Atom devices will still get Windows 10 security patches"

Microsoft says it will be offering the older Windows 10 Anniversary Update to Intel Clover Trail devices instead, and the company “will provide security updates to these specific devices running the Windows 10 Anniversary Update until January of 2023.” This date aligns with the original Windows 8.1 extended support period, which means that these older devices will still be supported with security updates but no new Windows 10 features.

Intel’s Atom processors were supposed to offer better battery life for smaller and cheaper tablet / laptop devices running Windows 8.1. A lack of good performance meant most consumers decided to purchase Intel’s Core series machines, and Intel eventually gave up on Atom last year. HP’s Envy X2 was one of the more popular Atom-based devices, but not many were widely used.
Read More »

Wednesday, July 19, 2017

Microsoft Released Windows 10 Redstone 2 Build 14905 for Fast Ring Insiders

Just a recent now after releasing windows 10 redstone 2 build 14901 Microsoft now again released windows 10 redstone 2 build 14905 for fast ring insiders and this windows only comes with fixes and improvement but not with new features. So far if you are experiencing some difficulties with your Anniversary Updates, then it is highly recommendable to update to this redstone 2 build 14905 as bug was fix and some improvement was also attach.

This build 14905 comes with both PC and Mobile and if you want to enable it on your PC just go to windows insider by opening Settings -> Update & security -> Windows Insider Program. After that, it will be downloaded to your PC via Windows Update.


The List of changes are as follow:
  • We have fixed an issue causing a large blank space to appear between the address bar and web content after the address bar moves back to the top when opening a new tab in Microsoft Edge.
  • We have updated Narrator Scan mode for table navigation to now support CTRL + ALT + HOME to go to the beginning of the table CTRL + ALT + END to go to the end of the table.
  • Microsoft Edge now supports the CTRL + O keyboard shortcut for setting focus to the address bar.
  • We fixed an issue resulting in Sketchpad and Screen Sketch crashing after trying to change the ink color twice in a row when the ruler was visible.

Known Issues

  • Support for kernel debugging over 1394 has been removed, but will be available in an upcoming kit release. A work-around will be posted to the Debugging Tools for Windows Blog shortly.
  • Adobe Acrobat Reader crashes when you try to launch it.
  • Cortana’s text to speech capabilities is not working in this build. For example, Cortana won’t be able to read text messages out loud for you, tell jokes, sing, or give verbal prompts.
  • When clicking on the power button on the Start menu, it closes the Start menu without opening the flyout with restart/shutdown options appearing. As a workaround – you can right-click on the Start button (or WIN + X) and choose to shutdown via this menu instead.
  • Apps such as Yahoo Mail, Trivia Crack, Google and the Skype Translator Preview app will crash in this build due to a compatibility issue from a recent platform change.
  • The Settings app may crash on certain editions of Windows 10 when navigating to different settings pages due to a missing .dll file. We are working on getting this fixed soon.
 Enjoy


Share This...
Read More »

Saturday, November 5, 2016

Microsoft explains why it's still building Windows 10 Mobile

Microsoft has again reaffirmed its commitment to supporting and developing Windows 10 Mobile. The smartphone platform now has less than one percent total market share but Microsoft still considers it important to have an OS that runs on mobile hardware.


Earlier this year, Terry Myerson, Microsoft's Executive Vice President of Windows and Devices, said smartphones aren't a "priority" for the company in 2016. It hasn't launched any new devices and only a handful of products have emerged from its third-party partners. Despite the almost non-existent hardware investment, the company has continued to push regular software updates to Windows 10 Mobile though.
Considering the platform's market share dropped below one percent a few months ago, some have questioned why Microsoft continues to keep it alive. Now would appear to be a good time to admit defeat and pull out of the market, concentrating instead on apps for iOS and Android. Microsoft is already focusing its app development on rival services and now often updates its Windows offerings after its iOS and Android ones.
In a recent interview with ZDNet, Myerson justified Microsoft's continued investment in mobile. He suggested that maintaining Windows 10 Mobile is no longer really about promoting the software to customers. Instead, the company needs to have access to the underlying technology, in case it has a need for a mobile platform in the future.
While Windows 10 for PCs and Windows 10 Mobile share a common core, they have some major differences. Most notably, the full version of Windows 10 cannot run on the ARM-based processors inside mobile devices. It doesn't support the telephony stack that runs handsets' phone and messaging features either. Windows 10 Mobile has these components. If Microsoft abandoned the OS, it would be left without this important infrastructure.
"There are really two things that are unique about Windows Mobile. One is cellular connectivity and the other one is the ARM processors that are there," said Myerson. "And I think both cellular connectivity and ARM processors have a role in the technical landscape of the future."
Microsoft's reluctance to abandon its ARM support and telephony stack can be explained by its past experiences. When the company launched Windows Phone 7 in 2010, its first true smartphone platform, it quickly ran into major problems that contributed to its failure in the industry since.
Windows Phone 7 was based on Windows Mobile 6.5. In turn, Windows Mobile used the Windows CE kernel, instead of the modern Windows NT. At the time, NT only supported desktop platforms. It had no telephony stack or ARM support, unlike the aging Windows CE. As it was coming late to the smartphone race already, Microsoft opted against building cellular connectivity into Windows NT. It went the easier route, using Windows CE as the base of Windows Phone 7.
This proved to be a disastrous decision. Windows CE wasn't designed to power modern smartphones and didn't support new and emerging features. Microsoft quickly realised it had to move its mobile efforts to Windows NT but the effort took two years of work.
In 2012, Windows Phone 8 emerged, running on modern, extendable technology. Because Microsoft had spent so much time migrating to Windows NT, it included very few new features to attract consumers though. Microsoft effectively lost two years of development time, letting its platform stagnate while it worked on a giant architectural shift, the benefits of which could never be explained to customers.
Myerson alluded to the situation, as well as other past failures, in the interview. "When you stop investing in these things, it's super hard, super, super hard to restart," he said. "And at Microsoft, we have a few of those examples where we stopped. Sometimes, when you're investing into growth, it's easier, but when you're investing for technical strategy or things like that, sometimes people question it — like you're doing right now."
Windows 10 Mobile may be getting little attention from Microsoft but the company has consistently stated it's not going away any time soon. Microsoft has previously suggested it will refocus its mobile ambitions in the coming years, once Windows 10 on PCs has become more established. It's thought the company is waiting for a chance to launch a category-defining device that will do to smartphones what the Surface did for convertible PCs.
Source; Digital Journal


Read More »

Thursday, September 1, 2016

How to Reset Windows 10 PC without loosing Important Files

Its quite normal for your Windows 10 PC to slow down after several app installs. Lagging could also be as a result of driver, registry or malware issues. Although we’d dropped a very helpful guide on how to fix a slow PC, resetting is sometimes the easiest fix but the fear of losing important files deters many. This guide will teach you how to reset your Windows 10 PC and most importantly, not lose your valuable files.

Will I lose my files and installed applications after I reset?


Installed applications? Yes. Files? depending on your selection. As a rule of thumb, backup all your important files to an external storage device (SSD, HDD, SD card or Flash drive). This guide is however aimed at preventing file loss as a result of the Operating System (OS) reset.

How do I reset my Windows 10 PC and still not lose my files?


* Note: Ensure that the PC’s battery is well charged or charging throughout the process (recommended) to avoid an interruption due to a drained battery.

There are two methods you could use:

    Reset from outside Windows
    Reset from within Windows (recommended)

How to Reset Windows 10 Without loosing important files

  • Launch the Windows Start menu and click Settings
  • Click Update & Security
  • Click Recovery and Select Reset This PC
  • If you wish to retain your files but remove apps and settings, select Keep my files (Recommended). If you wish to remove apps, settings and files, select Remove Everything.

  • You should get a notification of what is about to be removed
  • Click Reset to commence the reset
  • Sit back and take a cup of coffee and wait for the resetting process to be completed and you will find yourself in windows 10 setup menu

Don't forget to share!!!
    Read More »

    Thursday, August 18, 2016

    Download ISO images for Windows 10 Build 14905

    For those that are waiting for windows 10 Build 14905 official iso Images to be available from microsoft am just sad to inform you that the official iso image are not available but with the help of windows 10 ESD file and decrypter tool you can make your iso file.

    Windows 10 build 14905 has been released for Windows Insiders but official ISO images are not available as it is a Fast Ring build. Here is how you can get ISO images which you can use to install this build from scratch.

    At the moment of this writing, Windows 10 build 14905 was released for Fast Ring Insiders only. You can build the ISO images yourself in a few minutes. All Thanks Goes sergey tkachenko for making this simple and available also.
    how to make iso image for windows 10 build 14905


    How to Make iso image for windows 10 build 14901

    just follow the guide here and you are done


    If you don't want to miss any of our latest update you can subscribe here with your email address or you can follow us on facebook to get the latest updates about tech and more.

    Don't forget to share!!!
    Read More »

    Wednesday, August 17, 2016

    Some Context Menu items Missing in Win 10 If More Than 15 Files are Selected

    You can imagine if you are using windows 10 and suddenly when you select more than 15 files some context menu items will be missing, e.g the Open, Edit, Print menu will actually be missing when more than 15 files are selected. Why was this? because Microsoft is trying to limit the number operations you can run at a time to avoid your system from showing not responding behaviour, because if you open or edit more than 15 files at a time, there is a likely tendency that the system will start showing not responding or even freeze which is actually not good for the system.

    In this tutorial we can see how can increase to number from 15 to whatever you like so that you can open them at a time more especially if its pictures. But i can still recommend not to run this kind of batch operations at a given time because it will incapacitate your windows and system.

    If you want some of the Context Menu items to appear even after selecting more than 15 files then this tutorial is actually for you


    Enabling Context Menu items for more than 15 files in windows 10

    • Open Registry Editor
    • Go to the following key
    HKEY_CURRENT_USER\Software\Microsoft\Windows\CurrentVersion\Explorer
    • Create a 32-bit DWORD value named MultipleInvokePromptMinimum.
    • Set its value data in decimals to the number of items in Explorer for which you wish to have commands like Open, Edit, or Print visible. In the example below, I set the DWORD value data to 200 in decimals, so context menu commands will remain accessible for up to 200 selected files.

    how to enable context menu items
    credit: winaero

    • Restart your machine and you are good to go
    • Now you can select up to 200 files and run a batch operations at the same time but be wise about how you execute those commands
    If you dont want to miss any of our latest update you can subscribe here with your email address or you can follow us on facebook to get the latest updates about tech and more.
     

    Sharing is Sexy
    Read More »

    Tuesday, August 16, 2016

    How to Add PowerShell to New Context Menu of File Explorer

    Usually, to create a PowerShell file, you can either create a new text file and rename its extension every single time to .ps1, or you can use Notepad. Using Notepad, it is possible to save the entered text as a powershell file by selecting the File - Save menu item and typing the filename with the ps1 extension in quotes. It is necessary to add quotes to save it with the correct extension. Another option is the app Windows PowerShell ISE, which starts very slow, but can save your scripts directly to .ps1 files.

    In this Article you will easily know how to add powershell to your windows context menu without suffering to go through some tedious process and this trick works easily on windows 7, windows 8 and even windows 10.
     
    Normally there is need to edit your registry Editor but all thanks goes to Seygey Tkachenko for making the Ready-to-use Registry file and with a one-click you can enable the feature smoothly.
    how to add powershell to context menu of file exploerer
    credit: winaero

    How to Add PowerShell to New Context Menu of File Explorer

    Download the  Registry File here and double click to add your powershell easily and if you still prefer to use the other method by tweaking your registry editor check the guide here

    Read Also: download Avast for win 10


    If you dont want to miss any of our latest update you can subscribe here with your email address or you can follow us on facebook to get the latest updates about tech and more.
     

    Sharing is Sexy
    Read More »

    Monday, August 15, 2016

    Setting Up a Metered or Unmetered Wi-fi Connection in Windows 10

    Having a PC is one thing but maintaining its operating system is entirely another different issue, one of the core problems of windows 10 is frequent updates by Microsoft which some users are bitterly complaining, well some updates comes with a great handy feature while other updates comes with a bug and might make your PC slow or even create another scenario that isn't welcome.

    Some of the usual complains of users is that the operating system is actually consuming data unlike its counterpart windows 7 or less. because the rate at which the system processes it program is far better than the older OS.


    What is a metered or Unmetered Connection?

    Well to answer this question, let me use a simple language that we both understand here, metered connection can be regarded as a limited connection while unmetered connection can be said to be as a connection that is unlimited. When you buy data from your network subscriber and they allocate a certain MB/GB to you with a specified timeframe, then this is a metered connection but for instance your using a wireless network connection to browse, then you don't have to worry about the data or the timeframe, this is unmetered connection.


    Benefit of Setting your Connection to Metered

    The only benefit you will derive when you set up your connection to metered is that you PC cannot necessarily consumes your data much, because it cannot updates windows and moreover some apps might cease to function consuming your data.

    My recommendation here is that if your browsing with your internet service provider (ISP) i.e. your using a modem or any other portable hotspot then i urge you enable your connection status to metered connection but if there is no need to to disable your metered connection on wifi unless if you don't want to receive microsoft windows updates on your PC.


    How to Set a Wireless Connection to Metered or Unmetered

    • Click the Wireless Icon at the Bottom Right Corner of your windows 10 PC
    • Click Network Settings
    • Click Advanced options
    • Change Set as metered connection to ON for metered and OFF for unmetered
    setting upp metered connection]

    Thats all you can enjoy browsing and downloading on your PC without fear of data consumption

     
    Don't forget Share.
    Read More »

    How to Disable Automatic Updates of OS in windows 10

    If you are a windows 10 user, you already how often the windows updates rolls out because you can update your system more than four times a month unless the system is always offline. Microsoft usually releases updates of windows 10 operating system regularly and i know some win 10 users actually hate updating their system day-after-day more especially those who are browsing on a metered connection and risking the chance of saving your data from being consumed.

    A regular updates of windows is pretty much important because every update comes with a lot of security patches and bug fixes and it helps to keep your pc updates from any other program, but if on the other hand you don't like the updates and you wish to disable your windows update, then this guide is actually for you.

    I actually recommend you to allow windows updates if your using wifi connection on your PC but if your using your modem or any other metered connection, then you need to disable windows update in other to save your data.

    but before proceeding if your using a wireless (wifi) connection, then set your network setting to metered connection


    How to Disable Automatic OS Updates on windows 10

    • Click Start Menu and Select Setting
    • Click Updates and Security
    • Click Advanced Options
    • Click Choose how Updates are delivered
    • Set Updates from more than one place to Off
    choose how updates are delivered

    • Launch the Windows start menu then type services.msc and click it from the search results
    • The Windows Services dashboard should now be open. Scroll down and double-click Windows Update
    • Under Startup type, select Disabled
     
    how to disable automatic updates of windows 10
     
    • Click Apply then OK
    • The Windows update service should now be disabled
    • Restart the PC
    That's it you have successfully disable windows updates on your pc and you don't have to bother yourself about updating any more but if for a moment you wish to set the updates back to normal you can easily reverse the above settings

    If you dont want to miss any of our latest update you can subscribe here with your email address or you can follow us on facebook to get the latest updates about tech and more.
     

    Don't forget Share.
    Read More »